In Chapter 6 only C++ was used as an example. Since Player interacts with controlling code over network sockets, it's pretty easy to control robots (physical or simulated) with other languages as well. Player officially supports C++, C, and Python (see http://playerstage.sourceforge.net/doc/Player-3.0.2/player/group__clientlibs.html). There are also Third party libraries with support for clients ranging from Smalltalk to Java to MATLAB.
In this chapter, I will review the same examples given in
Chapter 6 for C++, hilighting the differences in the
new language.
Then, I will provide a new version of the
case studies
Trash Zapping Robot
and
Simulating Multiple Robots
for each.
8.1 - Coding in Python with playercpp.py
8.1.1 - Setting up playercpp.py interface
The C++ bindings are NOT made by default in player. You'll need to configure and compile player locally to make these - how to do this is well beyond the scope of this manual, but an overall procedure can be found here.
To see if the bindings are available, and to locate where they are, type
locate playercpp.py
and observe the path with site-packages in it's name.
TRY IT OUT
> cd <source_code>/Ch8.1
> locate playercpp.py            (note where it was found)
> player simple.cfg &
> gedit example0.py &            (update /usr/local/lib/pyton2.7/site-packages to wherever you found playercpp.py)
> python example0.py
8.2 Connecting to the Server and Proxies With Your Code
The first thing to do within your code is to include the Player interface file. Assuming Player/Stage is installed correctly on your machine then this can be done with the line
from playercpp import *
Next we need to establish a Player Client, which will interact with the Player server for you. To do this we use the line:
robot = PlayerClient("localhost");
What this does is declare a new object which is a PlayerClient called
robot which connects to the Player server at the given address. The
hostname and port is like that discussed in Section 4.1 - Device Address. If your code is running on the
same computer (or robot) as the Player server you wish to connect to then
the hostname is "localhost" otherwise it will be the IP address of the
computer or robot. The port is an optional parameter usually only needed
for simulations, it will be the same as the port you gave in the .cfg file.
This is only useful if your simulation has more than one robot in and you
need your code to connect to both robots. So if you gave your first robot
port 6665 and the second one 6666 (like in the example of
Section 4.2 - Putting the Configuration File Together) then you would need two
PlayerClients, one connected to each robot, and you would do this with the
following code:
robot1 = PlayerClient("localhost",6665);
robot2 = PlayerClient("localhost",6666);
If you are only using one robot and in your .cfg file you said that it would operate on port 6665 then the port parameter to the PlayerClient class is not needed.
Once we have established a PlayerClient we should connect our code to the device proxies so that we can exchange information with them. Which proxies you can connect your code to is dependent on what you have put in your configuration file. For instance if your configuration file says your robot is connected to a laser but not a camera you can connect to the laser device but not the camera, even if the robot (or robot simulation) has a camera on it.
Proxies take the name of the interface which the drivers use to talk to Player. Let's take part of the Bigbob example configuration file from Section 4.2 - Putting the Configuration File Together):
driver
(
  name "stage"
  provides ["position2d:0"
            "ranger:0"
            "blobfinder:0"
            "ranger:1" ]
)
Here we've told the Player server that our "robot" has devices which use the position2d, ranger, and blobfinder interfaces. In our code then, we should connect to the position2d, ranger, and blobfinder proxies like so:
positionProxy_name = Position2dProxy (client_name,index)
sonarProxy_name    = RangerProxy     (client_name,index)
blobProxy_name     = BlobfinderProxy (client_name,index)
laserProxy_name    = RangerProxy     (client_name,index)
A full list of which proxies Player supports can be found in the Player manual. They all follow the convention of being named after the interface they use.
In the above case Proxy_name is the name you want to give to the
proxy object, client_name is the name you gave the PlayerClient
object earlier and index is the index that the device was given in
your configuration file (probably 0).
8.2.1 - Setting Up Connections: an Example
For an example of how to connect to the Player sever and device proxies we will use the example configuration file developed in Section 4.2 - Putting the Configuration File Together. For convenience this is reproduced below:
driver
(
      name "stage"
      plugin "stageplugin"

      provides ["simulation:0" ]

      # load the named file into the simulator
      worldfile "worldfile_name.world"
)

driver
(
      name "stage"
      provides ["6665:position2d:0"
            "6665:ranger:0"
            "6665:blobfinder:0"
            "6665:ranger:1"]
      model "bob1"
)
To set up a PlayerClient and then connect to proxies on that server we can use principles discussed in this section to develop the following code:
from playercpp import *

robot = PlayerClient("localhost");
p2dProxy = Position2dProxy(robot,0);
sonarProxy = RangerProxy(robot,0);
blobProxy = BlobfinderProxy(robot,0);
laserProxy = RangerProxy(robot,1);

# some control code
return 0;
8.3 Interacting with Proxies
As you may expect, each proxy is specialised towards controlling the device it connects to. This means that each proxy will have different commands depending on what it controls.
In Player version 3.0.2 there are 39 different proxies which you can choose to use, many of which are not applicable to Player/Stage. This manual will not attempt to explain them all, a full list of avaliable proxies and their functions is in the Player manual, although the returns, parameters and purpose of the proxy function are not always explained.
The following few proxies are probably the most useful to anyone using Player or Player/Stage.
8.3.1 Position2dProxy
The Position2dProxy is the number one most useful proxy there is. It controls the robot's motors and keeps track of the robot's odometry (where the robot thinks it is based on how far its wheels have moved).
8.3.1.1 - SetSpeed ( )
The SetSpeed command is used to tell the robot's motors how fast to turn. There are three different SetSpeed commands that can be called, one is for robots that can move in any direction (omnidirectional), one is for for robots with differential drive (i.e. one drive wheel on each side), and the last for car-like drives.
SetSpeed(XSpeed, YSpeed, YawSpeed)SetSpeed(XSpeed, YawSpeed)SetCarlike(XSpeed, DriveAngle)
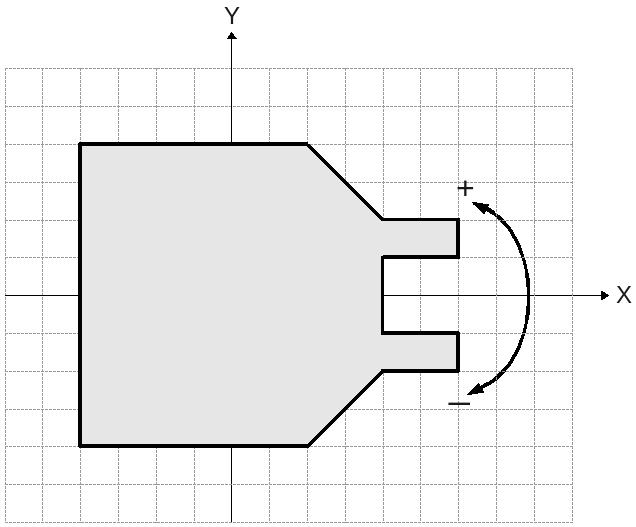 |
| Figure 8.3: A robot on a cartesian grid. This shows what directions the X and Y speeds will cause the robot to move in. A positive yaw speed will turn the robot in the direction of the + arrow, a negative yaw speed is the direction of the - arrow. |
Figure 8.3 shows which direction the x, y and yaw speeds are in relation to
the robot. The x speed is the rate at which the robot moves forward and
the y speed is the robot's speed sideways, both are to be given in metres
per second. The y speed will only be useful if the robot you want to
simulate or control is a ball, since robots with wheels cannot move
sideways. The yaw speed controls how fast the robot is turning and is given
in radians per second, Python has an inbuilt global function called
math.radians() which converts a number in degrees into a number in
radians which could be useful when setting the yaw speed.
If you want to simulate or control a robot with a differential drive system
then you'll need to convert left and right wheel speeds into a forward
speed and a turning speed before sending it to the proxy. For car-like
drives there is the SetCarlike which again is the forward speed in m/s
and the drive angle in radians.
8.3.1.2 - Get_Speed ( )
The GetSpeed commands are essentially the reverse of the SetSpeed command. Instead of setting a speed they return the current speed relative to the robot (so x is the forward speed, yaw is the turning speed and so on).
GetXSpeed(): forward speed (metres/sec).GetYSpeed(): sideways (perpendicular) speed (metres/sec).GetYawSpeed(): turning speed (radians/sec).
8.3.1.3 - Get_Pos ( )
This function interacts with the robot's odometry. It allows you to monitor where the robot thinks it is. Coordinate values are given relative to its starting point, and yaws are relative to its starting yaw.
GetXPos(): returns current x coordinate relative to its x starting position.GetYPos(): returns current y coordinate relative to its y starting position.GetYaw(): returns current yaw relative to its starting yaw.
TRY IT OUT (GetSetPositions)
This example shows how to get and set positions.
Read through the code before executing.
> cd <source_code>/Ch8.3
> player bigbob7.cfg &
> python bigbob8.py
In Section 3.2.1 - The Position Model, we specified whether player would record odometry by measuring how much the robot's wheels have turned, or whether the robot would have perfect knowledge of its current coordinates (by default the robot does not record odometry at all). If you set the robot to record odometry using its wheels then the positions returned by these get commands will become increasingly inaccurate as the simulation goes on. If you want to log your robots position as it moves around, these functions along with the perfect odometry can be used.
8.3.1.4 - SetMotorEnable( )
This function takes a boolean input, telling Player whether to enable the motors or not. If the motors are disabled then the robot will not move no matter what commands are given to it, if the motors are enabled then the motors will always work, this is not so desirable if the robot is on a desk or something and is likely to get damaged. Hence the motors being enabled is optional. If you are using Player/Stage, then the motors will always be enabled and this command doesn't need to be run. However, if your code is ever likely to be moved onto a real robot and the motors are not explicitly enabled in your code, then you may end up spending a long time trying to work out why your robot is not working.
8.3.2 RangerProxy
A RangerProxy interfaces with any ranger sensor.
A laser is represented by a ranger device with one ranger sensor, whose
samples attribute is greater than one. To minimize confusion with
the depreciated laser interface, I'll refer to these as single-sensor
devices.
A set of sonars or IR sensors is represented by a ranger device
with multiple ranger sensors whose samples attributes are not set (or
set to 1). To minimize confusion with the depreciated sonar and IR
interfaces, I'll refer to these as multiple-sensor devices.
Angles are given with reference to the laser's centre front (see Figure 8.4).
GetRangeCount(): The number of ranger measurements that the sensor suite measures. In the case of a single-sensor device, this is given by thesamplesattribute. In the case of a multiple-sensor device, this is given by the number of sensors.rangerProxy_name[ranger_number]: The range returned by theranger_numberth scan point. For a single-sensor device, scan points are numbered from the minimum angle at index 0, to the maximum angle at indexGetRangeCount()-1. For a multiple-sensor device, theranger_numberis given by the order in which you included the sensor in the world file. BUG ALERTRangerProxydoes not support indexing in the current distributed version ofplayer/playercpp.py. UseGetRange()below.GetRange(ranger_number): Same asrangerProxy_name[ranger_number].GetMinAngle(): gives the minimum angle (One tricky thing - you need to be sure to callRequestConfigure()once before accessing the min or max angles, they are initialized to zero!) covered by a ranger sensor. Only makes sense for a single-sensor device.GetMaxAngle(): gives the maximum angle covered by a ranger sensor. Only makes sense for a single-sensor device.GetAngularRes(): gives the angular resolution (Θ in Figure 8.4)
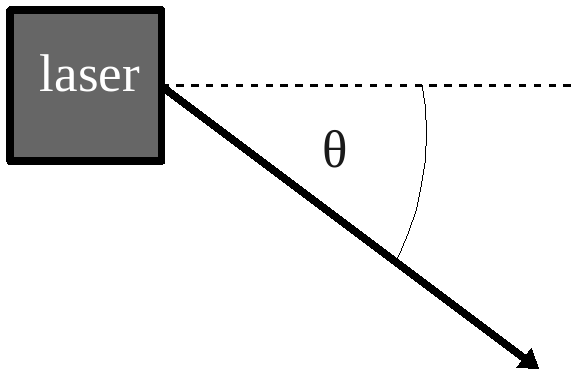 |
| Figure 8.4: How laser angles are referenced. In this diagram the laser is pointing to the right along the dotted line, the angle θ is the angle of a laser scan point, in this example θ is negative. |
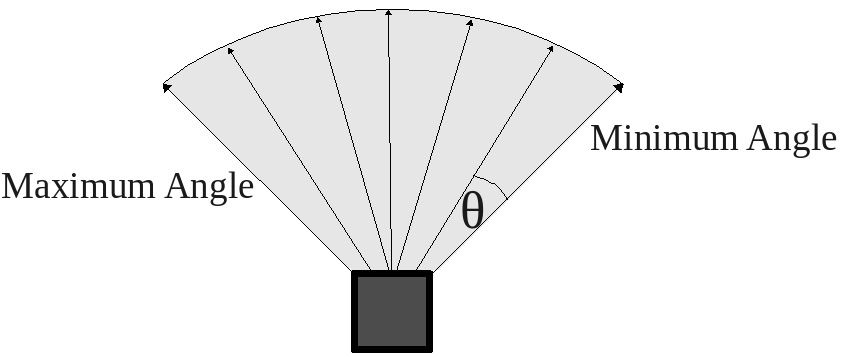 |
| Figure 8.5: A laser scanner. The minimum angle is the angle of the rightmost laser scan, the maximum angle is the leftmost laser scan. θ is the scan resolution of the laser, it is the angle between each laser scan, given in radians. |
TRY IT OUT (Ranger)
This example shows how ranger sensors can be read. Read through the code before executing.
> cd <source_code>/Ch8.3
> player bigbob7.cfg &
> python bigbob9.py
8.3.3 BlobfinderProxy
The blobfinder module analyses a camera image for areas of a desired colour
and returns an array of the structure playerc_blobfinder_blob_t, this is
the structure used to store blob data. First we will cover how to get this
data from the blobfinder proxy, then we will discuss the data stored in the
structure.
GetCount(): Returns the number of blobs seen.blobProxy_name[blob_number]: This returns the blob structure data for the blob with the indexblob_number. Blobs are sorted by index in the order that they appear in the image from left to right.GetBlob(blob_number): same asblobProxy_name[blob_number]
Once we receive the blob structure from the proxy we can extract data we
need. The playerc_blobfinder_blob_t structure, documented in the Player
manual
contains the following fields (see Figure 6.6 for illustration):
BUG ALERT Unfortunately, the C to Python interface doesn't do a good job at accessing data buried in C structures from python. So you can't get at the properties of the blob.
color: The colour of the blob it detected. This is given as a hexadecimal value.area: The area of the blob's bounding box. (In Stage 4.1.1, there is a bug with respect to the area. It is computed as anint, but return as anunsigned int. In order to use it, you must explicitly cast it as an int ((int)area). See http://sourceforge.net/p/playerstage/bugs/362/ and/or https://github.com/rtv/Stage/issues/41 for the details.)x: The horizontal coordinate of the geometric centre of the blob's bounding boxy: The vertical coordinate of the geometric centre of the blob's bounding boxleft: The horizontal coordinate of the left hand side of the blob's bounding boxright: The horizontal coordinate of the right hand side of the blob's bounding boxtop: The vertical coordinate of the top side of the blob's bounding boxbottom: The vertical coordinate of the bottom side of the blob's bounding box
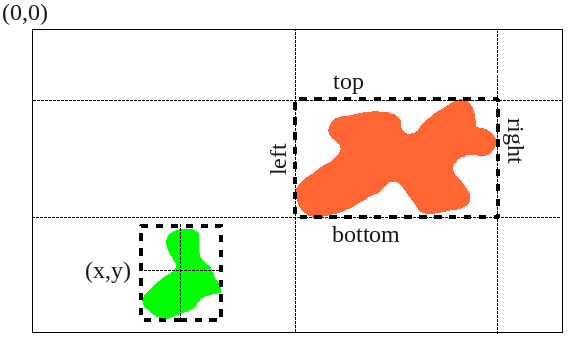 |
Figure 8.6: What the fields in playerc_blobfinder_blob_t mean. The blob on the left has a geometric centre at (x,y), the blob on the right has a bounding box with the top left corner at (left, top) pixels, and a lower right coordinate at (right, bottom) pixels. Coordinates are given with reference to the top left corner of the image. |
TRY IT OUT (blobfinder)
This example is supposed to show how to extract info from a blobfinder.
Read through the code before executing.
As mentioned above, this does not currently work. If you need a
blobfinder, you must write your controller in C or C++.
> cd <source_code>/Ch8.3
> player bigbob7.cfg &
> python bigbob10.py
8.3.4 - GripperProxy
The GripperProxy allows you to control the gripper. Once the gripper is holding an item, the simulated robot will carry it around wherever it goes. Without a gripper you can only jostle an item in the simulation and you would have to manually tell the simulation what to do with an item. The GripperProxy can also tell you if an item is between the gripper teeth because the gripper model has inbuilt beams which can detect if they are broken.
GetBeams(): This command will tell you if there is an item inside the gripper. If it is a value above 0 then there is an item to grab.GetState(): This will tell you whether the gripper is opened or closed. If the command returns a 1 then the gripper is open, if it returns 2 then the gripper is closed, and 3 if the gripper is moving.Open(): Tells the gripper to open. This will cause any items that were being carried to be dropped.Close(): Tells the gripper to close. This will cause it to pick up anything between its teeth.
TRY IT OUT (gripper)
This example shows a robot approaching a box, gripping it, and dragging it
backwards.
Read through the code before executing.
Note that the current version of Stage has a bug drawing the paddles
(sides of the gripper). When you issue a Close() command, they get an
unexpected offset.
> cd <source_code>/Ch8.3
> player bigbob11.cfg &
> python bigbob11.py
8.3.5 - SimulationProxy
The simulation proxy allows your code to interact with and change aspects of the simulation, such as an item's pose or its colour.
8.3.5.1 - Get/Set Pose
The item's pose is a special case of the Get/SetProperty function, because it is so likely that someone would want to move an item in the world they created a special function to do it.
SetPose2d(item_name, x, y, yaw)
In this case item_name is as with Get/SetProperty, but we can directly
specify its new coordinates and yaw (coordinates and yaws are given with
reference to the map's origin).
BUG ALERT
Unfortunately, the C++ to Python interface doesnt allow passing pointers from python. Thus, the GetPose2d call doesn't work.
If you download and compile the latest version of player, found on github, has this fix applied.
GetPose2d(item_name, double &x, double &y, double &yaw)
This is like SetPose2d only this time it writes the coordinates and yaw to the given addresses in memory.
TRY IT OUT (GetSetPose)
This example shows how to Set the pose of objects.
Read through the code before executing.
Note that due to the bug mentioned above, you can SetPose() but not
GetPose()
> cd <source_code>/Ch8.3
> player bigbob11.cfg &
> python bigbob12.py
8.3.5.2 - Get/Set Property
In Stage 4.1.1 the Get/SetProperty simulation proxy functions are only implemented for the property "color". None of the other properties are supported. Previous versions of Stage (before 3.2.2) had some code but it wasn't fully implemented, and it's been removed since.
If you desperately need this functionality you can use an earlier release of Stage, and the first edition of this manual describes how to get and set a model's property in those distributions.
In this edition of the manual I will describe the only functioning Get/SetProperty, which is "color".
To change a property of an item in the simulation we use the following function:
GetProperty(item_name, property, *value, value_len)
SetProperty(item_name, property, *value, value_len)
BUG ALERT Unfortunately, the C to Python interface doesn't do a good job at accessing data behind a pointer. So you can't get at the data within the *value.
item_name: this is the name that you gave to the object in the worldfile, it could be any model that you have described in the worldfile. For example, in Section 3.2.2 - An Example Robot in the worldfile we declared a Bigbob type robot which we called "bob1" so theitem_namefor that object is "bob1". Similarly in Section 3.2.3 - Building Other Stuff we built some models of oranges and called the "orange1" to "orange4" so the item name for one of these would be "orange1". Anything that is a model in your worldfile can be altered by this function, you just need to have named it, no drivers need to be declared in the configuration file for this to work either. We didn't write controllers for the oranges but we could still alter their properties this way.property: Currently,"_mp_color"is the only supported propery about a model that you can change.value: a pointer to the value you want fill with the property or assign to the property (see below).value_len: is the size of the value you gave in bytes.
The value parameter is dependant on which property you want to set.
"color": This requires an array of fourfloatvalues, scaled between 0 and 1. The first index of the array is the red component of the colour, the second is the green, third is blue and fourth is alpha (how light or dark the colour is, usually 1). For example if we want a nice shade of green, which has RGB components 171/224/110 we scale these between 0 and 1 by dividing by 255 to get 0.67/0.88/0.43 we can now put this into a float array with the linefloat green[]={0.67, 0.88, 0.43, 1};. This array can then be passed into ourSetPropertyfunction like so:SetProperty("model_name", "color", (void*)green, sizeof(float)*4 );
TRY IT OUT (GetSetProperty)
This example shows how to reset the color of an object. Read through the code before executing.
NONFUNCTIONAL
> cd <source_code>/Ch8.3
> player bigbob11.cfg &
> python bigbob13.py
8.4 General Useful Commands
8.4.1 - Read()
To make the proxies update with new sensor data we need to tell the player
server to update, we can do this using the PlayerClient object which we
used to connect to the server. All we have to do is run the command
playerClient_name.Read() every time the data needs updating (where
playerClient_name is the name you gave the PlayerClient object).
Until this command is run, the proxies and any sensor information from them
will be empty.
The devices on a typical robot are asynchronous and the devices in a
Player/Stage simulation are also asynchronous, so running the Read()
command won't always update everything at the same time, so it may take
several calls before some large data structures (such as a camera image)
gets updated.
8.4.2 - GetGeom( )
Most of the proxies have a function called GetGeom or GetGeometry or
RequestGeometry, or words to that effect. What these functions do is tell
the proxy to retrieve information about the device, usually its size and pose
(relative to the robot). The proxies don't know this by default since this
information is specific to the robot or the Player/Stage robot model. If
your code needs to know this kind of information about a device then the
proxy must run this command first.
8.5 Case Study 1: Using Python for a Trash-Zapping Robot
This case study is not yet ported to python, due to the inability to access data within the blobdata structure.
8.6 Case Study 2: Simulating Multiple Robots
Our robot simulation case study only shows how to simulate a single robot in a Player/Stage environment. It's highly likely that a simulation might want more than one robot in it. In this situation you will need to build a model of every robot you need in the worldfile, and then its associated driver in the configuration file. Let's take a look at our worldfile for the case study, we'll add a new model of a new Bigbob robot called "bob2":
bigbob
(
    name "bob1"
    pose [-5 -6 45]
    color "green"
)

bigbob
(
    name "bob2"
    pose [5 6 225]
    color "yellow"
)
8.6.1 - Each robot on it's own port
If there are multiple robots in the simulation, the standard practice is to put each robot on its own port (see Section 4.1 - Device Address. To implement this in the configuration file we need to tell Player which port to find our second robot on:
driver( name "stage"
        provides ["6665:position2d:0" "6665:ranger:0"
        "6665:blobfinder:0" "6665:ranger:1"]
        model "bob1" )

driver( name "stage"
        provides ["6666:position2d:0" "6666:ranger:0"
        "6666:blobfinder:0" "6666:ranger:1"]
        model "bob2" )
If you plan on simulating a large number of robots then it is probably worth writing a script to generate the world and configuration files.
When Player/Stage is started, the Player server automatically connects to all the ports used in your simulation and you control the robots separately with different PlayerClient objects in your code. For instance:
# first robot
robot = PlayerClient("localhost",6665);
sp = RangerProxy(robot,0);
lp = RangerProxy(robot,1);
pp = Position2dProxy(robot,0);

# second robot
robot2 = PlayerClient("localhost",6666);
sp2 = RangerProxy(robot2,0);
lp2 = RangerProxy(robot2,1);
pp2 = Position2dProxy(robot2,0);
Each Player Client represents a robot, this is why when you connect to a proxy the PlayerClient is a constructor parameter. Each robot has a proxy for each of its devices, no robots share a proxy, so it is important that your code connects to every proxy of every robot in order to read the sensor information.
How you handle the extra PlayerClients and proxies is dependent on the scale of the simulation and your own personal coding preferences. It's a good idea, if there's more than maybe 2 robots in the simulation, to make a robot class which deals with connecting to proxies and the server, and processes all the information internally to control the robot. Then you can create an instance of this class for each simulated robot (obviously the robot's port number would need to be a parameter otherwise they'll all connect to the same port and consequently the same robot.) and all the simulated robots will run the same code.
TRY IT OUT (bigbob2)
This example shows the final code for two trash-zapping robots. Read through the code before executing.
> cd <source_code>/Ch8.6
> player bigbob2a.cfg &
> make bigbob2a
> ./bigbob2a
8.6.2 - Each interface on it's own index
An alternative to using a port for each robot is to use the same port but a different index.
For example, the Bigbob robot uses interfaces and indexes: position2d:0, ranger:0, blobfinder:0 and ranger:1. If we configured two Bigbob robots to use the same port but a different index our configuration file would be like this:
driver( name "stage"
        provides ["6665:position2d:0" "6665:ranger:0"
        "6665:blobfinder:0" "6665:ranger:1"]
        model "bob1" )

driver( name "stage"
        provides ["6665:position2d:1" "6665:ranger:2"
        "6665:blobfinder:1" "6665:ranger:3"]
        model "bob2" )
In our code we could then establish the proxies using only one PlayerClient:
robot = PlayerClient("localhost",6665);
sp = RangerProxy(robot,0);
lp = RangerProxy(robot,1);
pp = Position2dProxy(robot,0);

sp2 = RangerProxy(robot,2);
lp2 = RangerProxy(robot,3);
pp2 = Position2dProxy(robot,1);
TRY IT OUT (bigbob2, unique indices)
This example shows the final code for the trash-zapping robot. Read through the code before executing.
> cd <source_code>/Ch8.6
> player bigbob2b.cfg &
> make bigbob2b
> ./bigbob2b